Ubuntu에 sun java jdk 설치
설치방법 :
Sun jdk 설치
$ sudo apt-get install sun-java6-jdk
document 설치(직접 받아야돼서 약간 복잡)
$ sudo su
# wget http://cds.sun.com/is-bin/INTERSHOP.enfinity/WFS/CDS-CDS_Developer-Site/en_US/-/USD/VerifyItem-Start/jdk-6-doc.zip?BundledLineItemUUID=w75IBe.mRe8AAAEbvBE5FJtH –O jdk-6-doc.zip
(이 링크는 변할 수 있음 http://java.sun.com/javase/downloads/index.jsp 에서 Java SE 6 Documentation을 선택함)
# mv jdk-6-doc.zip /tmp/
# apt-get install sun-java6-doc
아래는 삽질한 과정입니다.
ssh public key 인증 만들기
리눅스 ssh v2 기준, 다른 서버로 접속할 때 암호 입력 안하고 하려면, 사용하는 방법.
은재님의 리눅스에도 있습니다. 봤던 기억이.(지금도 홈페이지 있는지 모름)
- public key 인증의 배경 지식
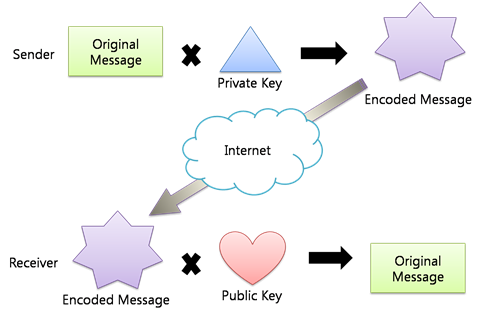
public key/ private key 인증방식의 원리는 이렇습니다.
암호화 하는 사람은 키를 두개 가지고 있습니다. 하나는 암호화와 복호화를 다 할 수 있고 다른 하나는 복호화만 할 수 있습니다.
암호화와 복호화를 다 할 수 있는 키를 개인키(private key)라고 하고 그건 자기만 갖고 있습니다.
복호화만 되는 키는 공개키(public key)라고 하고 이건 자기가 보낼 메시지를 받는 상대방에게 미리 전해줍니다.
물론 공개키가 가로채는 놈(hijacker)에 의해 알려지면 암호화된 메시지를 풀어볼 수 있겠지요.
그래서 공개키도 안전하게 미리 전달되도록 합니다. 이건 한번만 전송되니까 일단 가지고 있게 된 이후에는 문제 없겠지요
그래서 암호화된 메시지를 전달해주면 받은 쪽에서는 공개키로 풀어서 원래 메시지를 복구해냅니다.
ssh의 public key 인증도 이런 방식을 사용한 방법중 하나입니다.
private key는 사용자가 가지고 있고, public key를 서버에 저장해둔 다음 이후 private key 인증만 미리 사용자 터미널에서 해 두면 서버에 접속할 때는 암호 입력 안하고 이 키를 가지고 통신합니다.
- private key, public key 쌍 만들기
ssh-keygen이란 프로그램이 있습니다. man ssh-keygen 하면 설명을 볼 수 있습니다.
하지만 일단 필요한 것은 그냥 ssh-keygen 을 실행하는 것 뿐
[danielsong@chagall ~]$ ssh-keygen
Generating public/private rsa key pair.
Enter file in which to save the key (/home/danielsong/.ssh/id_rsa):
Created directory '/home/danielsong/.ssh'.
Enter passphrase (empty for no passphrase):
Enter same passphrase again:
Your identification has been saved in /home/danielsong/.ssh/id_rsa.
Your public key has been saved in /home/danielsong/.ssh/id_rsa.pub.
The key fingerprint is:
..... danielsong@chagall이렇게 .ssh란 디렉토리가 만들어지고 id_rsa와 id_rsa.pub 파일이 만들어집니다.
여기서 id_rsa는 자기만 갖고 있을 파일이고 id_rsa.pub은 다른 서버에 배포할 파일입니다.
[danielsong@chagall ~]$ ls -l .ssh
합계 16
-rw------- 1 danielsong danielsong 1675 5월 21 14:43 id_rsa
-rw-r--r-- 1 danielsong danielsong 410 5월 21 14:43 id_rsa.pub.ssh 디렉토리의 권한은 다음과 같이 되어 있어야 합니다. 아니면 chmod 700 .ssh
drwx------ 2 danielsong danielsong 4096 5월 21 14:43 .ssh
- public key를 배포. authorized_keys
접속할 서버를 봅시다. 거기 접속해서, .ssh 디렉토리가 있는 지 보고 없으면 만들고,
authorized_keys 파일을 만듭니다. 권한은 다음과 같아야 합니다. 아니면 chmod 600 authorized_keys
-
-rw------- 1 root root 1095 2008-04-01 18:16 authorized_keys
열고서, 아까 id_rsa.pub 내용을 복사합니다.(키의 일부 내용은 생략했어요.)
ssh-rsa ............B3..........................AAAQE.............oh+l3b37g0ZVfkRcne+fPMx9i4NoFtRrRyCTACZDXA4rAFXS4Kx3NGAanQOVR5k2etHJdJBfD6Jo4+0Oj+yTvCmhD33NkB5SJ50gknLggdkQn+BjwJVj3BSWF+96kT9z7/z/bxqYP7q17wpSse132XwfxRBXR1zkTiivpOQxuOawJMwoo8+6gU9Bgfej5bMZy5NbWjczkXJYZwkOcG7JCAGozXjX9fpJ48rwkJ/4IbuRpzM14LHK7HF29CC24URQSix5xvjQ0ZCcMyprbFL5xAFc+yoSZV9Y18wDFJgRmcagGLte2sESOWalSSYDU3xR2gs7XQ== danielsong@chagall
- 접속
서버에 접속해봅니다.
[danielsong@chagall ~]$ ssh root@test_target
Last login: Wed May 21 13:06:30 2008 from 147......
[root@test_target .ssh]#
gprof 간단사용
gcc 옵션에 -pg를 붙여서 컴파일한다.
그리고 컴파일한 프로그램을 실행하면,
gmon.out 이란 파일이 생긴다.
그리고 gprof 실행
gprof 사용법은,
gprof [실행 binary] [실행으로 생성된 gmon.out]
$ gprof myprog gmon.out > profile.txt
gnuplot 간단사용법
정말 단순한 점 그래프만 그릴거라면
텍스트 파일에 컬럼으로 쭉 덤프된 파일 만들고
$ gnuplot
#gnuplot 프롬프트에서
# plot "dump.txt" u 1:2 title "column2", "dump.txt" u 1:3 title "column3"
이런식으로 쓰면 됨.
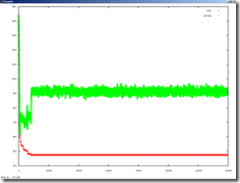
이 그림은
plot "r30.txt" u 1 title "best", "r30.txt" u 2 title "average"
plot 커맨드를 파일에서 입력해 그리고자 한다면
echo "plot \"${PLOT_FILE}\" u 1 title \"best\", \"${PLOT_FILE}\" u 2 title \"average\"" > plot.cmd
gnuplot -persist plot.cmd
이런식으로 하면 된다.
-persist는 플롯을 그리고 나서 종료되어도 플롯 그림은 그대로 남아있게 하는 옵션이다.
/var/tmp/badcontext
관리하는 서버가 계속 이런 파일이 생기네요
selinux관련 오류같은데
일단
restorecon으로 클리어하고 지우면 된다는군요.
selinux를 잘 몰라서.. 좀 더 알아봐야겠습니다.
http://www.redhat.com/archives/fedora-selinux-list/2004-September/msg00161.html
restorecon -f /var/tmp/badcontext.YGZFP27816
Will fix the context, then delete the files. We are investigating how do handle this better. Also
some of the bad contexts are not really bad, IE the tools not smart enough to realize that the context is
valid. Setfiles is just reporting files that don't match the regular expessions in the file_contexts file.
So cache files created by mozilla get marked as bad even though they are valid.
bash에서 for문을 c언어처럼 쓰기
#!/bin/bash
for i in `seq 1 10`;
do
echo $i
done
#!/bin/bash
COUNTER=0
while [ $COUNTER -lt 10 ]; do
echo The counter is $COUNTER
let COUNTER=COUNTER+1
done
#!/bin/bash
COUNTER=0
while [ $COUNTER -lt 10 ]; do
echo The counter is $COUNTER
let COUNTER=COUNTER+1
done
#!/bin/bash
COUNTER=20
until [ $COUNTER -lt 10 ]; do
echo COUNTER $COUNTER
let COUNTER-=1
done
산술계산
echo $((1+1))
echo $[1+1]
복잡한 계산은 bc를 사용한다
"echo 3/4 | bc -l"
Redirection
http://www.cpqlinux.com/redirect.html
[root@server /root]# ./cmd 1>out.txt 2>err.txt
[root@server /root]# ./cmd 1>>out.txt 2>>err.txt
[root@server /root]# (((./cmd | tee stdout.txt) 3>&1 1>&2 2>&3\
|tee stderr.txt) 3>&1 1>&2 2>&3) 1>out.txt 2>err.txt
Note: Lines that end in a backslash are continued on the next line. Any such lines should be keyed in as one complete line. The lines are too long to fit on the web page without formatting them this way.
The following will capture a copy of stdout and save it to a file called "stdout.txt"
[root@server /root]# ./cmd | tee stdout.txt
stdout goes through the pipe and tee is able to save a copy of it to the file "stdout.txt"; however, we just lost control of stderr. stderr will not go through the pipe, instead it goes directly to our display.
Lets gain control again of stderr and stdout. We do this by surrounding our command with a set of parenthesis.
[root@server /root]# (./cmd | tee stdout.txt)
Capturing stderr
Now that we have swapped our stdout and stderr, lets hook up tee once again. tee will now capture stderr (tee believes that it is really stdout because stdout is the only thing that can come through the pipe).
[root@server /root]# (./cmd | tee stdout.txt) 3>&1 1>&2 2>&3 \
| tee stderr.txt
make image script (u-boot용 커널 이미지 생성)
$ cat make_image.sh
#!/bin/sh
TARGET_IMAGE=MPkernel`grep "EXTRAVERSION =" Makefile | awk '{print $3}'` # ----> MPkernel이름에 Makefile에 있는 버전정보를 붙인다.
TARGET_IMAGE=${TARGET_IMAGE}-`date +%m-%d` # ---> 추가로 날짜를 붙인다.
mkimage -A arm -T kernel -C none -a 0x7fc0 -e 0x8000 -n MPCore -d arch/arm/boot/Image ${TARGET_IMAGE} && echo resulting image name = ${TARGET_IMAGE}
$ ./make_image.sh
Image Name: MPCore
Created: Tue Apr 8 14:54:37 2008
Image Type: ARM Linux Kernel Image (uncompressed)
Data Size: 2549424 Bytes = 2489.67 kB = 2.43 MB
Load Address: 0x00007FC0
Entry Point: 0x00008000
resulting image name = MPkernel-arm1-perfctr-04-08
실행하면 위와같이 생성된다.
개인적으로 나중에 보려고 올림.
wget으로 웹페이지에 링크돼 있는 문서들 다 받기
웹페이지가 있고 그 페이지에 여러 페이지나 자료의 링크가 있는데 이걸 다 받고 싶은 경우 wget 의 옵션을 사용하면 됩니다.
(예를 들어 강의 페이지의 자료들을 한꺼번에 받고 싶을 때 말이죠)
일단 해당 페이지를 받습니다.
$ wget URL
예를 들어
$ wget html://rommance.net/misc_path/a.html
그 다음 이 웹 페이지에서 나온 링크들을 전부 받습니다.
이제 사용하는 옵션은
-i : 뒤에 나오는 파일 안에 있는 URL을 다 다운로드 합니다.
-F : 파일을 html로 인식한다.
-B : Base URL(상대경로의 링크일 때 기본 베이스 주소)
이 세가지를 쓰면 됩니다.
$ wget -i a.html -F -B http://rommance.net/misc_path/
이런 식으로 사용하면 a.html 안에 있는 링크된 페이지와 자료들이 다 다운로드 됩니다.


 I was senseless and ignorant; I was a brute beast before you.
Yet I am always with you; you hold me by my right hand.
You guide me with your counsel, and afterward you will take me into glory.
Whom have I in heaven but you?
I only have you in my life